A tour of the editor
The editor has four parts. The top bar, the preview, the right panel with its nine tabs, and the timeline at the bottom.
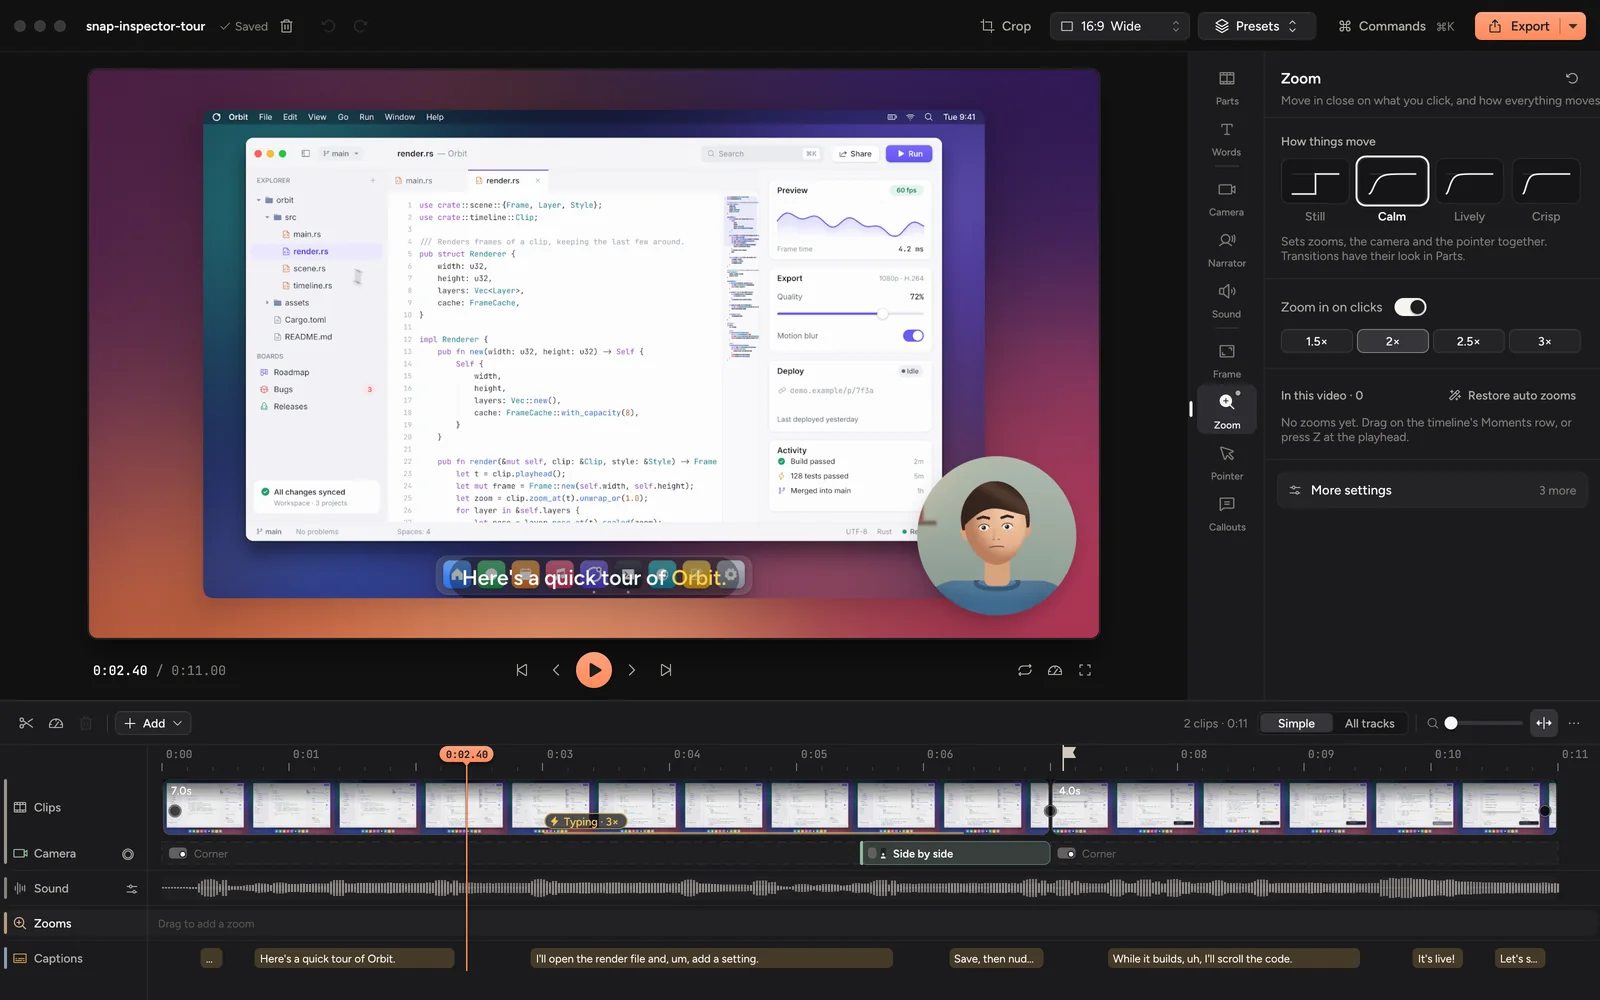
1. Top bar
The project name (click it to rename), Saved when your changes are stored, and undo and redo. On the right:
- The aspect menu sets the shape of your video, such as 16:9 Wide for YouTube or 9:16 Vertical for phones.
- Presets saves a look and applies it to other videos.
- Commands (⌘K) finds any action or setting by typing its name.
- Export (⌘E) makes the video file.
2. Preview
The video as it will look when exported, with every zoom, background and caption. Press Space to play and ← or → to step one frame.
You can work right on the video too: drag yourself to move the camera, double-click yourself to change the layout, and drag captions or callouts to place them.
3. The tabs on the right
Nine tabs, each with one job. Press ⌘1 to ⌘9 to jump to them in this order:
| Tab | What it's for |
|---|---|
| Parts | The parts and slides in your video, in order, and how they join. See Record in parts. |
| Words | Edit by words, and show them as captions. See Cut by editing words. |
| Camera | Where you appear in the video and how you look. See Your camera in the video. |
| Narrator | An AI voice or AI presenter reads your script. See AI narration. |
| Sound | Every sound in the video and how loud it is. See Make your voice clear. |
| Frame | What sits around your screen: background, corners, shadow and crop. See Choose a background. |
| Zoom | Move in close on what you click, and how everything moves. See Zoom in on what you click. |
| Pointer | How the pointer looks and clicks, and the keys you press. See The pointer. |
| Callouts | Labels, notes, highlights and blurs over your screen. See Callouts. |
A small dot on a tab means you changed something there.
4. The open tab
Every tab starts with one line about what it does, then the settings most people need. Less common settings sit under More settings at the bottom, which says how many of them you changed.
When you select something on the timeline, such as a clip, a zoom or a callout, the tab shows that item's settings instead.
Don't know where a setting lives? Press ⌘K and type it, such as "shadow" or "mirror". Cinemac opens the right tab and points the setting out. See Find any setting.
5. Timeline
Your video from left to right, with a row for each kind of thing in it, top to bottom:
- Clips and Camera: your recording, slides and camera changes. Cut, trim and reorder them here.
- Sound: everything you hear, mixed. The button next to its name opens the mixer.
- Zooms, Callouts, Loupe and Blurs: what happens on top of your screen.
- Captions, Narration and Shortcuts: the words on screen or spoken, and the keys you press.
Rows with nothing in them stay hidden until you open their tab. All tracks shows every lane.
The orange line is the playhead. See Timeline basics.