Add slides
Press ⇧T or click Slide in Parts. Preview a kind, choose where it goes, then click Insert. Type the words in the inspector. Parts → Slide defaults previews a shared theme and logo before you apply them.
A slide is a full-frame card that plays between parts of your recording: a title at the start, the points of a chapter, or an end card with a link.
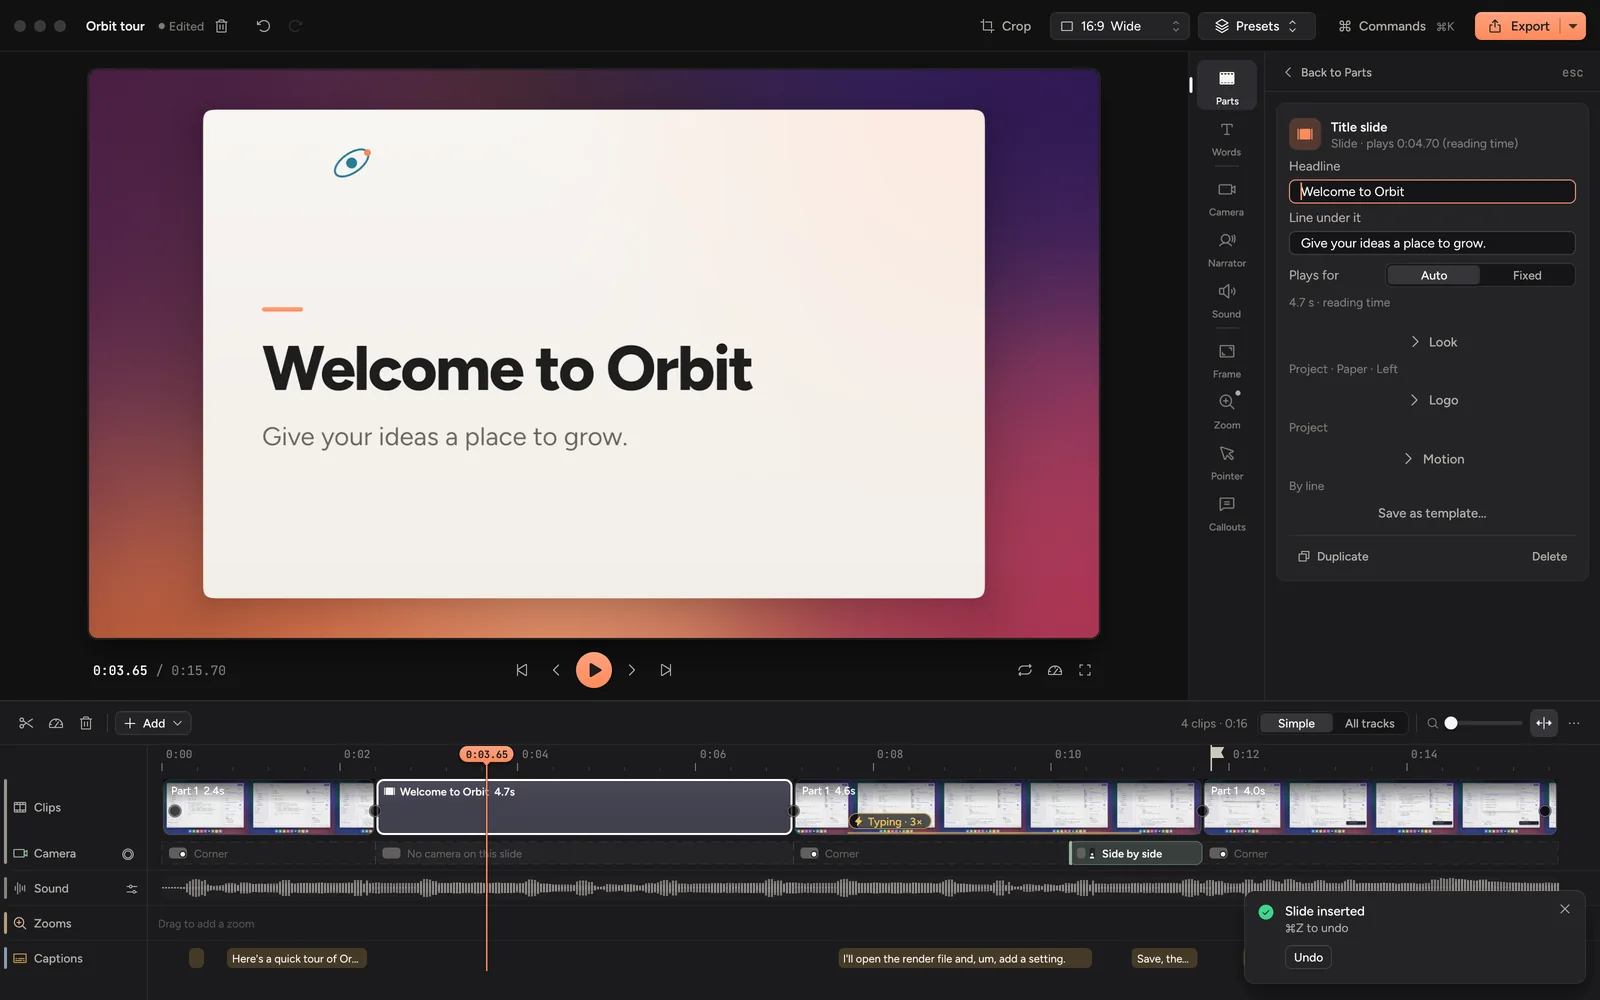
Add a slide
- Move the playhead to where the slide should go.
- Press ⇧T, click Slide at the top of the Parts tab (⌘1), or click Add in the timeline bar and pick Slide.
- Pick Title, Points, Number, Image, Split or End, or a starting point below them. The main preview shows the choice without adding it to the video. Number keys 1–6 choose the six basic kinds.
- Choose At playhead, After this part, At the start or At the end. Review the position, then click Insert or press Return. Cancel or esc closes the preview without adding a slide.
The slide goes onto the timeline's Clips row: at a nearby join, or with the recording split around it. The inspector opens ready to type. It also appears in Parts; drag it in that list to move it. An uninserted preview is never saved or exported.
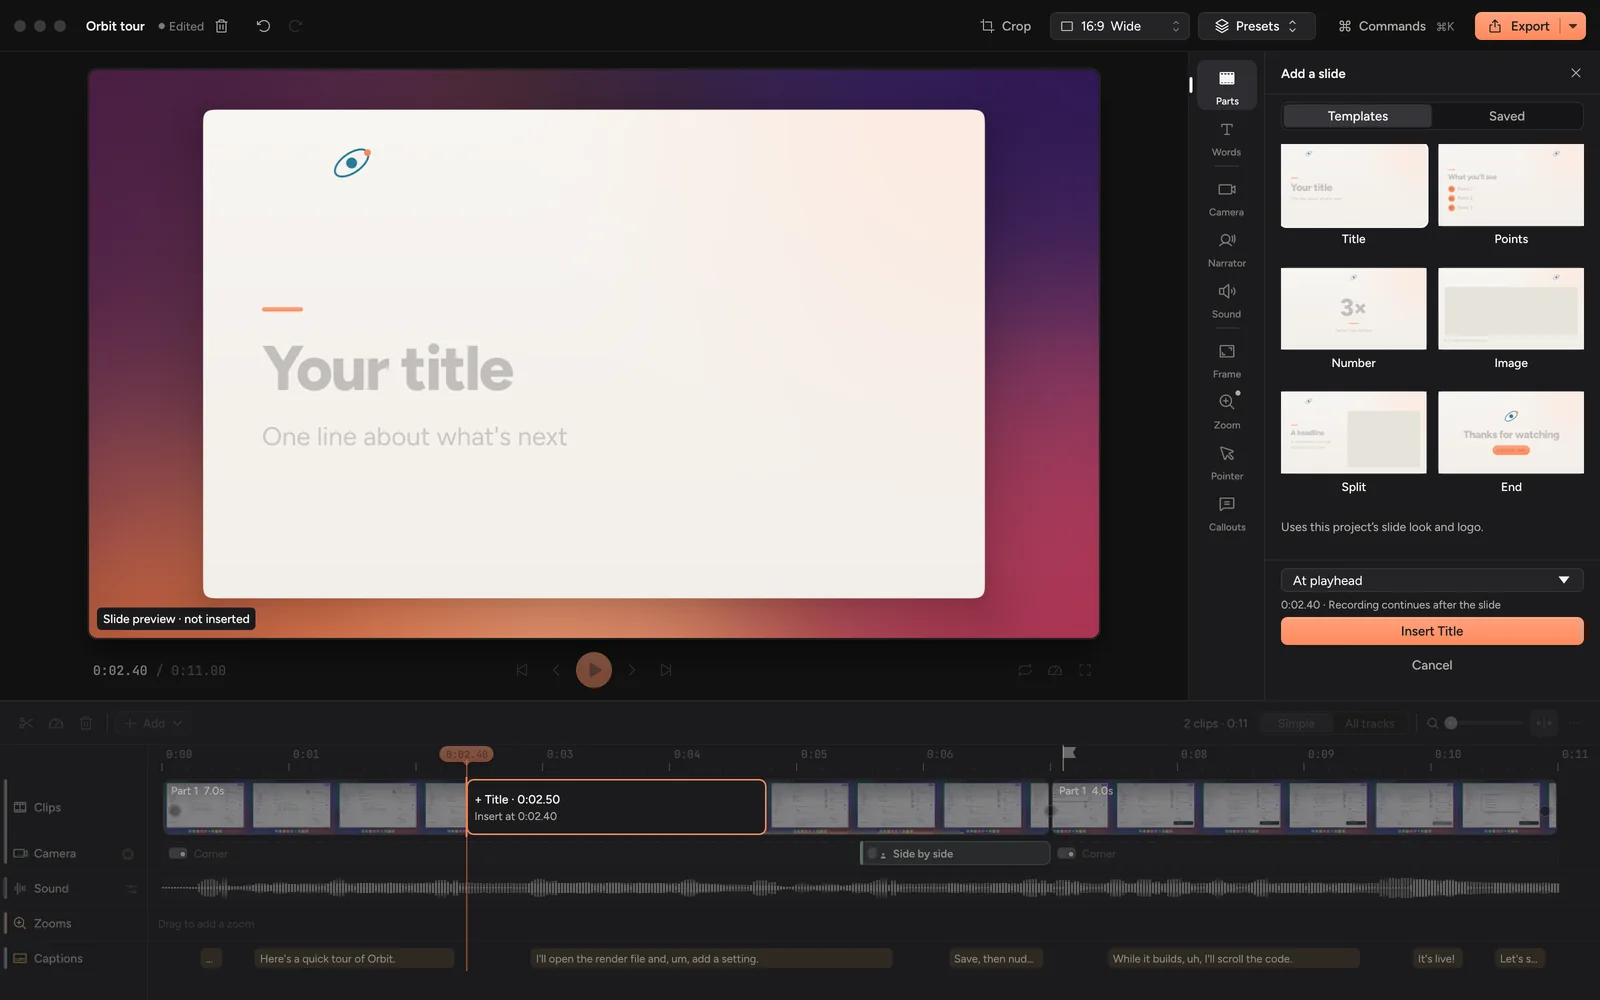
Pick a kind
Choose a kind when inserting. To change an existing slide's kind, select it and open Look:
| Kind | What it shows |
|---|---|
| Title | A headline and a line under it. |
| Points | A headline and a short list. Turn on One at a time to bring the points in one after another. |
| Number | One big number, like 3×, and a line under it. |
| Image | A picture, with a caption. |
| Split | Words on one side and a picture on the other. |
| End | A closing line and a link. |
| Before / After | Two pictures with separate Fit/Fill controls, side by side or stacked in square/portrait. |
Type in the content fields at the top of the inspector, or double-click words on the preview. For Points, click Add a point for another line. Picture chooses the content image on Image and Split slides. Every kind also has a separate Logo section. Switching kinds retains words and pictures that the new kind does not display, so you can switch back.
The words get smaller to fit the slide, and a long word or link wraps. If there are too many to fit even then, the card says Too many words to fit: shorten them, or split them over two slides. If a picture is missing or can't be opened, its row on the card says so.
Use a frame from your recording
On an Image or Split slide, you can use a recording frame as its picture:
- Select the slide and keep its content controls open.
- Click or drag the timeline ruler to a frame of your recorded footage. The slide stays selected.
- Click Use current frame beside Choose picture. The picture is added when capture finishes.
The capture keeps your source crop, upright device orientation and privacy masks. It leaves out the video frame, camera, pointer, captions, zooms and callouts. The chosen frame is frozen when you click, so moving the playhead afterwards does not change the result. If the playhead is on a generated slide, the button explains how to move onto footage first.
Your words, logo, picture fit and current duration stay in place. Undo removes the change in one step. The picture is stored with the project and follows Save As and slide copies. Replacing the picture or deleting its slide while capture is running prevents a late result from overwriting your next edit.
How it looks
Open Look, Logo or Motion below the content and timing controls. Edit content returns to the words:
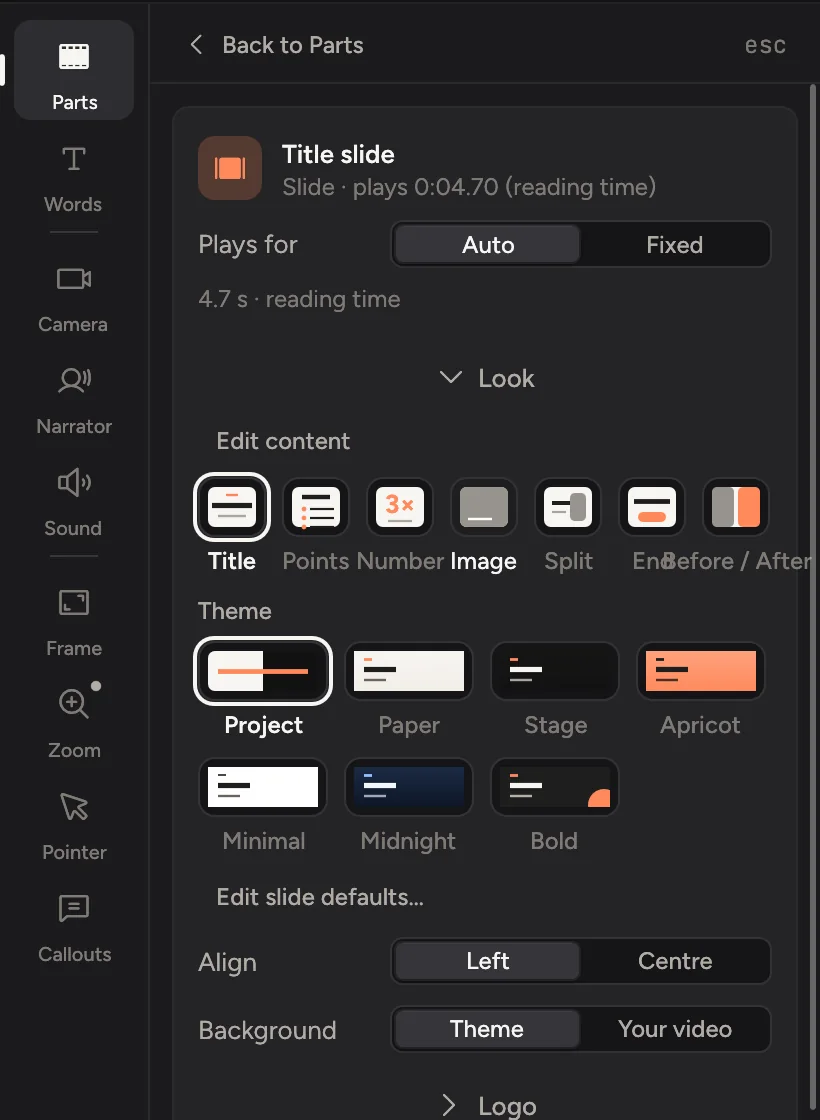
- Words come in: how the words arrive as the slide comes on. By line brings each line in a moment after the last, By word brings in one word at a time, and Together shows them all at once. A big number counts up to its value, and a picture settles into place. They move in the motion feel you picked under Transitions, and a slide shows everything at once while the video is paused, so you can edit it.
- Align: Left or Centre, for Title, Points and Number slides. An End slide stays centred.
- Picture fills: Fill crops the picture to its place, Fit shows all of it.
- Background: Theme puts the words on the theme's colours. Your video puts them over your recording, softened, so the slide feels part of the video.
Start with a purpose
Below the templates, More starting points offers Chapter, Result, Recap and Closing invite. They use the familiar Title, Number, Points and End layouts with appropriate alignment and word arrival. Recap starts with three point fields. Preview one, insert it, and type your words; the example text stays a hint and is never exported. Each still follows the project's slide theme and logo.
Explain a sequence
In Add a slide, choose Step by step below the six kinds, then Insert Step. It is a numbered Split slide. Write the headline and explanation, then choose a picture or use a recording frame.
Click Add next step in its inspector to continue. The next slide keeps its look, logo, transition and fixed duration if you set one. Its words and picture start empty. Each sequence numbers itself in timeline order: move or delete a step and the numbers update. Other sequences and ordinary Number slides keep their numbers.
For an existing Split slide, open Look and turn on Numbered step to start a new sequence. Turn it off to remove numbering. Duplicate keeps the content and continues the sequence; Paste and inserting a saved template start a separate sequence at 1.
Steps follow the video's aspect ratio. Landscape puts words beside the picture; square and portrait put words above it. Pictures keep their independent Fill/Fit choice, and the logo stays separate.
Compare Before and After
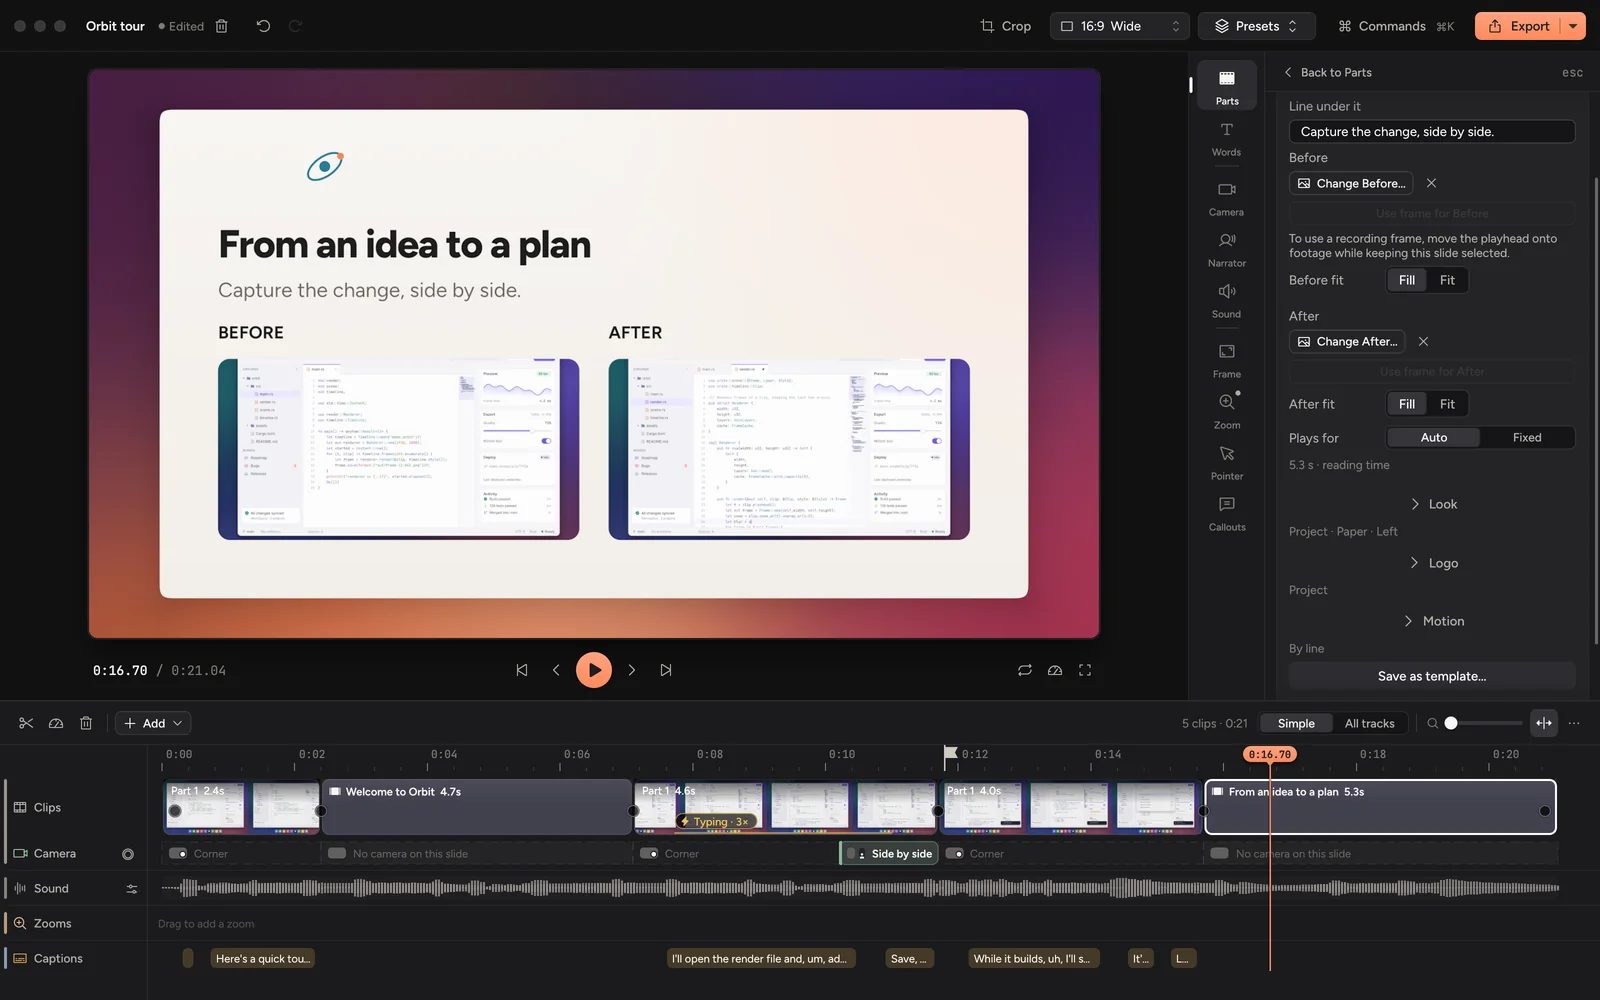
In Add a slide, choose Before / After, then insert. Add an optional headline and explanation. Choose Before… and Choose After… pick the two pictures; each has its own Fill / Fit control directly below it. Fill crops to the picture’s space; Fit shows the complete image. Changing or removing one side preserves the other picture, words, timing and logo.
To use recorded footage, keep the slide selected, scrub onto a recording, then click Use frame for Before or Use frame for After. The capture keeps crop and privacy masks. Landscape shows Before on the left and After on the right; square and portrait stack Before above After. The logo stays separate and never changes that order.
Save as template… leaves both pictures empty by default. Keep pictures retains both in the reusable template. Slides already inserted retain their own copies if you delete the template or its original files.
Add a logo
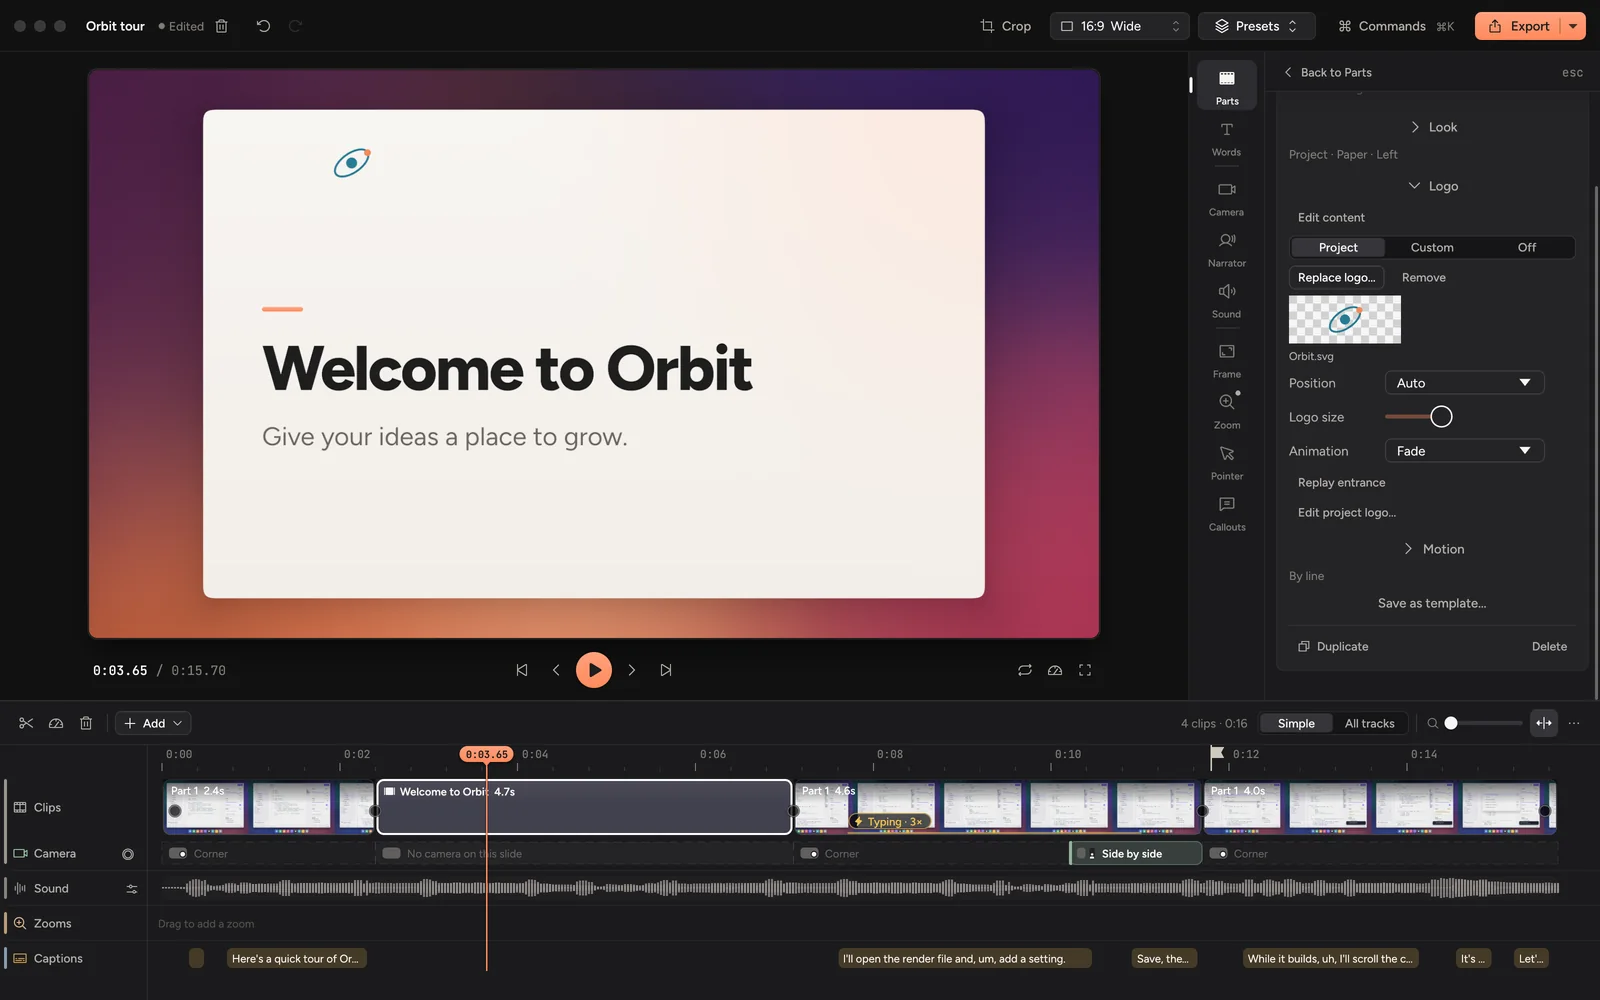
Every slide can show a logo, including imported pages. In its Logo row, choose Custom and pick a file, Project to use your reusable project logo, or Off to hide it on that slide. The content picture on an Image, Split or Page slide stays separate.
- Position: Auto uses the template's designed placement, including the central mark on an End card. Or choose one of the four corners. In a corner, the logo lines up with the slide's words: its edge sits on the same margin as the headline, and the words make room for it instead of getting smaller.
- Size: make the logo smaller or larger without stretching or cropping it.
- Animation: Still, Fade, Rise or Gentle scale. The animated options enter once, in about 0.3–0.4 seconds. Replay entrance plays it from the beginning. When the video's motion feel is Still, logos stay still.
Changing a Project logo's position, size or animation keeps its artwork linked: replacing the project logo later updates this slide too. Reset placement restores the source's position, size and animation without changing the chosen artwork.
Open Edit project logo… to preview a reusable logo, or choose Use in project defaults… to start with this slide's custom logo. Both open the Slide defaults screen.
Imported pages keep their own branding by default. Choose Project on a particular page, or turn on Include imported pages in Slide defaults to use the inherited logo throughout the deck. Pages explicitly set to Project stay opted in when that checkbox is off.
PNG, JPEG, still WebP and static vector SVG are supported, up to 8 MB. Transparent PNG and SVG work well: empty transparent edges around the artwork are left out, so the logo lines up by what you can see. For SVG, convert text to outlines and use artwork without linked or embedded images. Cinemac copies the file into the project when saved, and keeps the reusable logo in saved looks. A missing or unreadable logo is reported on the card and in export warnings.
Move pieces on the slide
Drag the logo, the headline, the line under it, a picture or the list of points to anywhere on the slide. Select the slide or nothing, pause, then point at a piece on the preview: it shows its name and an outline.
- While you drag, lines show when a piece lines up with the middle of the slide, the margins or another piece's edge or centre, and it settles there. Hold ⌥ to move it freely.
- Drag it back near where it started and it settles there too.
- A piece always stays on the slide.
- Double-click words to type them, as before.
- Right-click a piece for Edit words, Put it back or Put everything back.
Each slide keeps its own moves, in the preview and the export, and each drag is one undo step. Look lists the pieces you moved, with Put everything back. The Logo section has Put back for the logo.
A moved piece keeps its place when you change its words, theme or the video's shape. Changing the slide's kind puts every piece back. Changing the logo's position, or choosing another logo, puts the logo back. On an imported page only the logo moves.
Coding agents move pieces too. Ask Claude Code or Codex to "move the logo a little right and the headline up" and it moves them by the same names. See Agents.
Save a reusable template
Select a slide and choose Save as template…. Name it and check the preview. The template keeps layout, appearance choices, word motion, transition and Auto/Fixed timing policy. Its text and pictures become placeholders, and its logo follows the project where you reuse it.
Turn on Keep current text, Keep pictures or Keep custom logo only for content you want to reuse. Pictures and custom logos are copied into the template. The source project can then move or be removed. A name already in use gets a number, such as Product step (2); saving does not replace another template. Imported pages can be duplicated, but cannot be saved as editable templates.
Open Add a slide → Saved, choose a template, review the main preview and insertion position, then click Insert saved slide. Fill in its content in the inspector. Cancel adds nothing; insertion is one undo step. Each inserted slide owns its pictures and custom logo independently.
Use a saved row’s ··· menu to Rename… or Delete…. Delete removes it from Saved in every project; slides already inserted keep their content. Library changes are separate from the project’s undo history. Refresh saved templates rereads the library. If a template changes while you preview it, select it again before inserting.
Duplicate, copy and paste
- Duplicate at the bottom of the slide's card, or ⌘D, puts a copy right after it.
- ⌘C copies the selected slide and ⌘V pastes it at the playhead, in this project or another one.
A copy keeps the slide's words, look, length and the move it comes in with. What you filmed, said or pinned on the slide stays with the original.
The Parts list shows a small picture of each slide, so you can find the one you want.
Theme
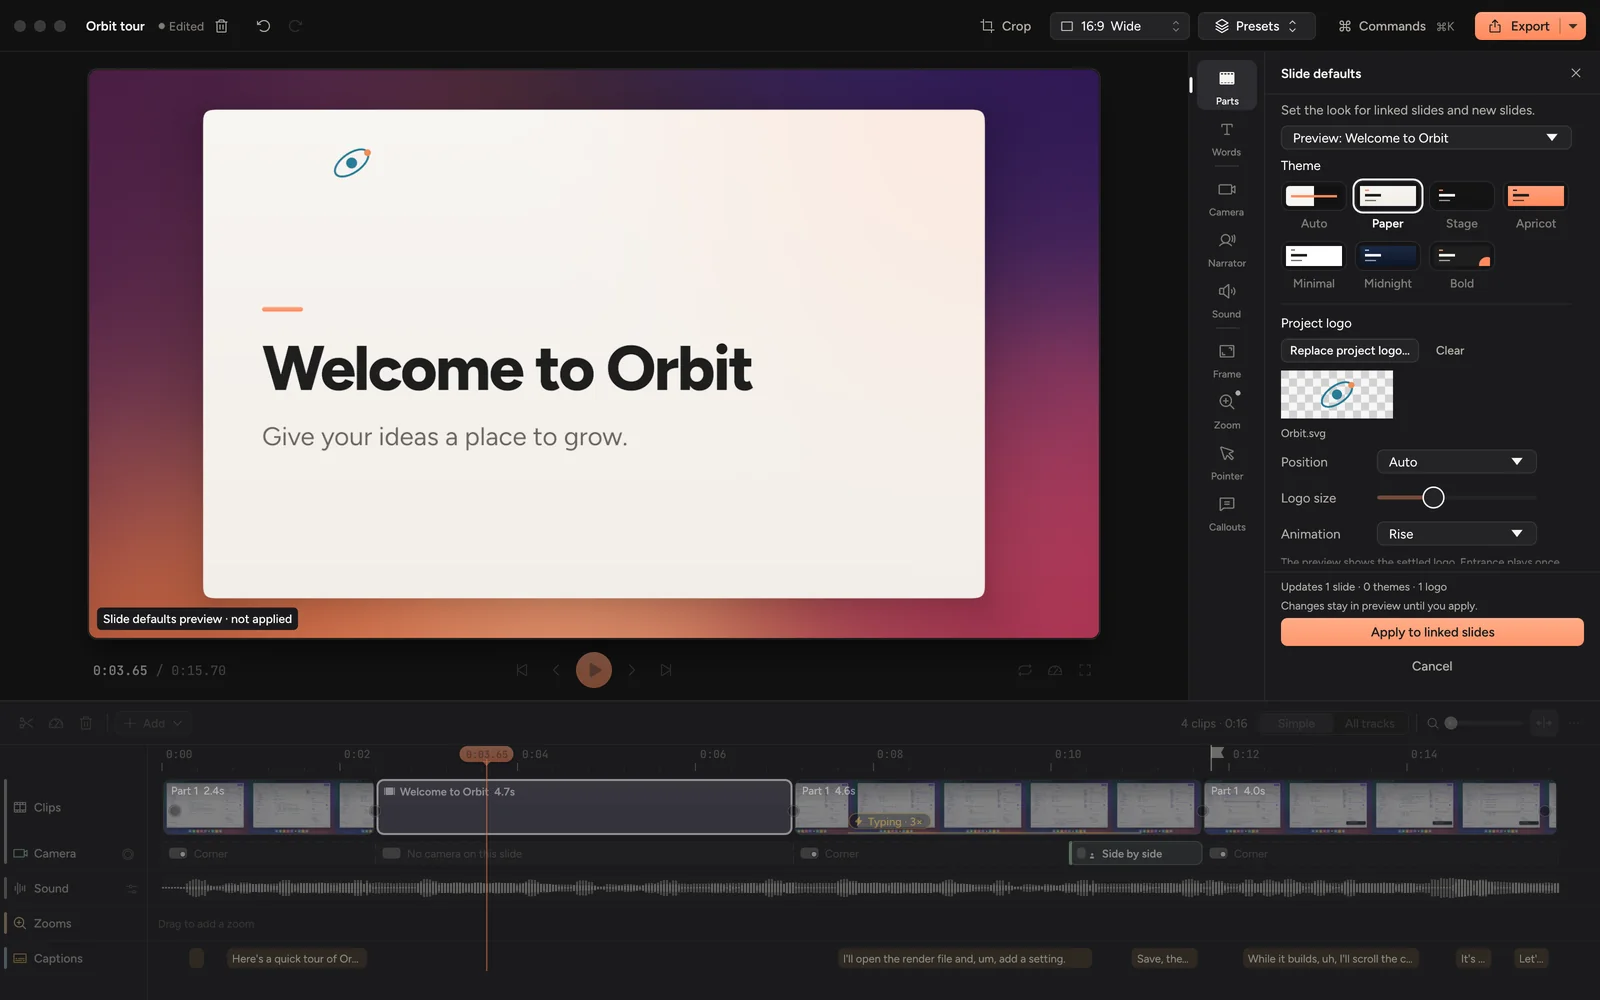
Under Look → Theme, pick Paper, Stage, Apricot, Minimal, Midnight or Bold. Project follows the shared Slide defaults. Each slide can keep its own theme.
Slide defaults
Open Parts → Slide defaults… to set the theme and reusable logo for linked slides and new slides. Choose an existing slide or Example slide to preview the result. Existing slides with their own theme or a Custom/Off logo keep those choices.
The bottom of the inspector shows how many slides, themes and logos will change. Apply to linked slides saves the change in one undo step. Cancel restores the previous view; previews do not change the saved project or exports. In a short window, settings scroll while Apply and Cancel stay visible.
To deliberately reset existing choices, choose Replace slide overrides…, read its scope, then Replace overrides & apply. This replaces custom themes, Custom/Off logos and local placement with the defaults. Imported pages participate only when Include imported pages is enabled; their artwork and aspect stay intact. Undo restores all the prior settings.
If an agent changes the project while this screen is open, Review latest scope refreshes fields you have not edited and keeps your own changes for review before Apply. Presets → Save current style saves the defaults with the project's whole look.
How long and how it moves
- Plays for: choose Auto to follow reading or voice timing, or Fixed to set a duration. Only the words this kind of slide shows count toward reading time, so hidden words from another kind do not make it longer. If you make it too short to read, the inspector says so.
- How it comes in and goes out: click the chip before or after the slide on the timeline's clip lane, and pick a move such as Float or Dissolve. The look you picked under Transitions in Parts sets the usual one. See How clips join, open and end.
Slides that follow your voice
A slide whose length you didn't set by hand follows whoever talks over it:
- Narration: a slide plays as long as the narration lines on it, and a breath.
- Your voice: when you record yourself or a voiceover, the slide waits while you're still talking, and → moves on sooner. It keeps the length it was recorded at.
- Points: on a Points slide with One at a time on, each point comes in as it's said. Cinemac listens to your takes on this Mac after you record them. Every point is in before the slide ends, however short it is: on a very short slide they're all there from the start.
The slide's card says when it follows your voice. Set Plays for to choose its length yourself.
Present a deck
Bring in the slides you already have and talk through them, on camera or with just your voice.
- Export your slides as a PDF from Keynote, PowerPoint or Google Slides.
- To start a new project from it, click New from PDF… on Projects, or drop the PDF there. To add it to a project, move the playhead to where the deck should go, click Add in the timeline bar and pick Present a deck, or drop the PDF on the editor. Pictures work too: pick a few and each one becomes a page, in name order. A long PDF takes a moment: press esc to stop.
- Each page comes in as a slide in its own shape, so a 4:3 or portrait page has no bars. Notes, shapes and highlights drawn on the PDF come in with it. Present your deck opens.
- Choose Camera or Just my voice. Cinemac remembers your choice. With just your voice, the camera stays off.
- Click Start presenting. Talk over each page: it waits for you until you press → for the next one. On the last page, → ends it. Press esc to throw the take away.
Each page then plays as long as you talked on it. With just your voice, what you said is kept page by page, so it moves with its page if you reorder them. Two decks side by side each count their own pages, so the card and the recording bar say Page 2 of 5 of the right one.
To do a page again, select it and click Present from here on its card. It presents that page and the pages after it. What you said or filmed on those pages before is replaced, and ⌘Z brings it back.
A page's card also has Plays for and, if you were on camera, You on this slide.
Zoom into a slide
Zooms work on slides and on a deck's pages, so you can move in on one chart or one line.
- Drag on the Zooms row over the slide, or move the playhead onto it and press Z.
- Click the zoom. Under Zoom into, click the spot on the picture of the page.
- Set Level for how close it gets.
A zoom on a slide belongs to it: it moves with the slide when you reorder, and Restore auto zooms keeps it. The page stays sharp when zoomed.
You on a slide
The camera steps away for slides, so the slide fills the frame. If you recorded yourself over the slide, You on this slide lets you pick how you appear on it, such as in a corner or full screen.
Shorten or delete a slide
- Press ⌫ with the slide selected to delete it. Narration on it, and a voiceover that runs on past it, stay in the video where the slide was, one line after another as they were on the slide. What you filmed of yourself on it, and a voiceover said on that page alone, go with it. A video always keeps at least one clip, so the last one left can't be deleted. ⌘Z brings the slide back with everything on it.
- To cut a stretch out of a slide, press I at its start and O at its end, then press X. What you filmed, said or pinned on that stretch goes too, and the rest of the slide moves up, still in step with you. ⌘Z brings it all back in one step.
Add your own elements
Click a slide on the preview (or select it on the timeline) and pause. An Add bar sits along the bottom of the video: Text, Picture, Shape, Arrow and Icon, with Line, Note and Logo under ⋯. The slide's card on the right has the same under Add to the slide. Blank gives you an empty canvas in the theme's colours, and imported PDF pages take the same things on top of their own artwork.
Press T on a selected slide to add a text box and type straight away, at the size the words will show. Return starts a new line; ⌘Return, Esc or a click elsewhere keeps your words. Double-click a text box or note to type in it again. Drop a picture on a selected slide, or paste one with ⌘V, to add it; pictures are copied into the saved project.
Click something to select it (Shift-click adds more), or drag a box across an empty part of the slide. Drag to move it: guides snap it to the middle, the margins, the slide's words and the other things (hold Option to move it freely; Option-drag makes a copy). Each kind has the handles it needs:
- Text boxes: corners to size the box, and side handles to change where the words wrap.
- Lines and arrows: a handle on each end (hold Shift to keep the angle to steps of 45°) and one in the middle: drag it to the side to curve the line.
- Everything else: its corners. Pictures, the logo and icons keep their shape unless you hold Shift.
A small toolbar above what's selected has the changes you make most: a text box's style, bold, centring and colour; a picture's Replace and fit; a shape's kind and outline; a line's colour, weight and arrowheads; an icon and its colour. ⋯ (or a right-click) has Duplicate, Bring to front, Send to back, Lock, Hide, Show on every slide and Delete. With several selected, the toolbar lines them up, spreads them evenly and groups them.
The card on the right has everything for what's selected, in plain words: the words, its look, Comes in, and Position (line it up on the slide, put it in front or behind, lock it, or put it back where it started). Back to slide at the top (or Esc) returns to the slide's own card. A warning shows there when something covers the slide's words or sits under your camera.
The slide's card lists what's on the slide under On this slide, front first. Click one to select it, drag one up or down to put it in front of or behind the others, and use its eye to hide or show it. Things shown on every slide are listed too, and each slide can hide them.
Use the arrow keys to nudge (Shift for ten points), ⌘D to duplicate, Backspace to delete, and ⌘C/⌘V to copy things between slides. ⌘] / ⌘[ bring forward and send backward; ⌘G groups and ⇧⌘G ungroups. Each drag is one undo step.
Comes in chooses when something arrives: With the slide, After the words, After a delay, When I say it, or On my next press, and how: None, Fade, Rise or Grow (Draw for lines, arrows and notes; Type for text). When I say it listens for the words in your recorded or narrated voice, as Points slides do. During a presentation, each arrow-key press brings in one waiting thing before the page turns; keeping the take saves that timing, and cancelling leaves the slide unchanged. Paused editing shows everything, and the video's Still motion setting wins.
Show on every slide reuses something throughout the project, and each slide can hide it. Slide defaults → On every slide edits shared words or removes shared things. Saved slide templates keep what you added; Keep current text and Keep pictures apply to it as well.
Changing the output shape keeps each element anchored to its nearest edge or the centre, with its size and edge gap measured in slide units. Text rewraps; objects stay inside the slide. Guides also snap custom objects to the headline, logo and other designed pieces.